WE WILL BE OUT OF THE COUNTRY UNTIL JULY 5TH. NO ORDERS PLACED WILL BE SHIPPED OUT.
TRANSMISSION AND CLUTCH INFORMATION

OLD vs NEW STYLE SHAFTS
There has been a lot of questions about what they changed in the new style main shafts from 2019 and on. In the pic here you can see the longer main shaft compared to the new shorter style main shaft. This allows you to remove the secondary clutch without removing the engine. The new shaft is also thicker by 2mm and requires a different clutch spacer.

2015 - 2019 Main Shaft
Here is a photo of the older style main shaft that holds the secondary clutch. Here you can see the longer shaft sticks out connected by a nut. You need to loosen or remove the engine to remove the clutch on this style.

2019-Newer Main Shaft
Here you can see the difference with the newer style main shaft. You are able to remove the secondary clutch due to the shaft being shorter, thus allowing the clutch to slide out without removing the engine. It is held on by a bolt instead of a nut.
THROTTLE STOP ADJUSTMENT
HOW TO CHECK YOUR THROTTLE STOP
Back in 2015, HiSUN had the Strike 250 reaching top speeds of close to 50mph! The legal department had a fit, and HiSUN changed that the following year. Now when you purchase a new HiSUN Strike or Sector 250, they have been known to only go up to 28mph. One of the key items installed was a throttle stop. This is an adjustment at the throttle pedal that prevents the throttle from opening fully, thus keeping the vehicle at a child safe speed. To check if you are getting full throttle, remove the center console cover between the seats. With the 250 off, press down on the throttle pedal and check the throttle body to see if the throttle valve is opening all the way. If not, then you can adjust the throttle stop located at the throttle pedal so that when the pedal is depressed fully, the throttle is opening fully as well. DO NOT FULLY REMOVE THE THROTTLE STOP. this might result in the throttle cable breaking as the pedal will have nothing to stop it from stretching and breaking the cable. You want to adjust the throttle just enough so that when the pedal is pressed down all the way, the throttle is open fully.
If you have any questions, please contact me for more information.

BATTERY CHARGING PLUG
INSTALLING BATTERY CABLE CHARGING ADAPTER
If you are anything like me, you don't ride every month of the year. This might cause your battery to loose it charge. To jump the battery or charge it, you need to remove the drivers seat, then the seat bracket to gain access to the battery. I have found an easier way to get this done without having to remove the seat again.
I first removed the drivers seat, then the seat bracket. I then removed the small plastic panel to gain access to the battery. I installed a universal battery charging adapter onto the battery. I then ran the wire from the battery compartment, and then closed the plastic cover. I then installed the seat bracket but make sure to keep the battery lead between the two front bolts, thus allowing the battery charging plug to run under the seat and out the front. This way when you need to charge the battery or jump it, you can just access the plug and you are ready to go.

FUSE BOX
REPLACING FUSES
This is an area that I get a lot of calls on. Someone is out for the weekend and they call to say it has no power, and nothing is working. One of the main issues is the poor quality fuses in the fuse box. Which is also a pain to get to in a pinch. You must remove the drivers seat, then unbolt the seat slider bracket and gain access to the battery compartment. You will find a small plastic box with three wire connectors going into it. There are four small screws holding the cover on. Remove the cover and you will see the fuses. I would recommend replacing them all with good quality fuses.

NUTS & BOLTS
REPLACE YOUR NUTS!
This is a topic that has come across my desk almost daily. The bolts HiSUN used to assemble the 250 were of poor quality, such so that they weren't ever rated for strength. I would inspect your suspension and chassis bolts to ensure they have a marking on the head of the bolts like shown in the picture here. If not, you should invest about $65 and get some high quality nuts and bolts.

SEAT BELT SAFETY
QUALITY 4 POINT HARNESS
This is a topic on safety. I replaced my OEM seat belt with a much better quality 4 point harness for very little money. They were easy to install and work much better over the factory seat belt. One of the best harnesses you can get is from Bartact. Phone: 951-319-4008 They sell a 4 point harness that fits the HiSUN well and is very adjustable for almost any size person. It has a quick disconnect button and easy to secure for almost any age. Don't take the factory one for a high quality one and assume it is the safest out there. The OEM seat belts are not rated for racing, so why would you assume they are great at keeping your kids safe. Spend a few $ and make sure your kids are the safest they can be. Tell them Matt from Warrrior Off Road sent you for a great price. P/N
BARTACT SB2X2-A-B 2" x 2"

TRAILER HITCH
TRAILER HITCH INFO
This is information on building a trailer hitch for the Sector 250. As a disclaimer, please note: HiSUN does not recommend a trailer hitch on this vehicle due to the limitations on the clutch. That being said, if you wanted to purchase a trailer hitch for your Sector 250 we not have them available in the purchase section. Easy to install, no cutting or welding needed. Simple bolt on design.

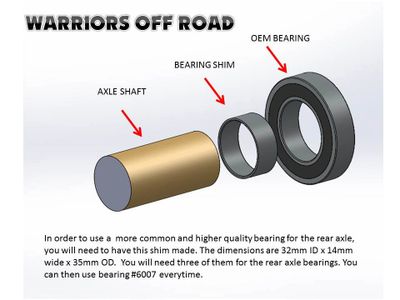
REAR AXLE BEARINGS
REAR AXLE BEARING SHIMS
Here is a great tip for you looking to replace worn out rear axle bearings and replace with a higher quality one you will find they are a unique size only to HiSUN. Have some bearing shims made, then you will be able to use a more common and reliable bearing #6007. You will need to have three of them made as there are three bearings in the rear axle. The shim size should be 32mm ID with 35mm OD and 14mm wide. No one makes a direct replacement bearing except HiSUN, and they are not of the highest quality.
suspension upgrades
BETTER SHOCKS ON THE CHEAP$$$
We spent a lot of time energy and effort in coming up with the perfect all around shock upgrade for the 250 model. These shocks have adjustable preload and height adjustments. The ride quality is improved greatly over the stock shock setup. See our store for details.

rear sprocket guard dimensions free.
Free CAD drawing
This is something a lot of you have been asking for. I have the drawings for a rear sprocket guard. If you would like to make your own, just contact me and I will send you the drawing. It can be made out of 3/16" steel or alloy. Use the contact me section and ask for the rear sprocket guard. Free.